The 17 trays are stacked up with every 2nd tray rotated by 90 degree to form an x-y plane between trays. The bottom-most tray is bolted to a base plate of the tracker and the orientation of the bottom-most tray in reference to the base plate is unique. The 2nd tray from the bottom is rotated by 90 degree clockwise in reference to the bottom-most tray. The 3rd tray is stacked in the same orientation as the bottom-most tray, the 4th tray is in the same orientation as the 2nd tray, and so on. This gives you the top-most tray being placed in the same orientation as the bottom-most tray.
On each tray X or Y of a track is measured. A layer on the bottom-most
tray is measuring Y. Both layers on the 2nd tray from the bottom then
measure X. Layers on the 3rd tray measure Y, ones on the 4th X, and so
on. This gives you a layer on the top-most tray measuring Y. The X- or
Y-coordinate increases from the left side towards the right side on a
tray, where a left side of the tray is defined as the left side when you
look at the top side of the tray with a readout electronics for a top
side layer set at the bottom of your view. The left-most strip always
has a strip number 0 on both sides of a tray, no matter which axis it
measures. A strip number ranges from 0 to 1599 on a full tray, from 0
to 1279 on a 4 ![]() 4 tray, and from 0 to 959 on a 3
4 tray, and from 0 to 959 on a 3 ![]() 3 tray.
3 tray.
The Z-axis of the tracker is defined as an axis going from the bottom to the top of the tracker. In the beam test the beam is incident from the top of the tracker with normal incident configuration, namely, the beam travels -Z direction. The plane number is assigned to each x-y plane starting with 0 increasing in +Z direction. Therefore, the beam hits Plane 15 first and Plane 0 last.
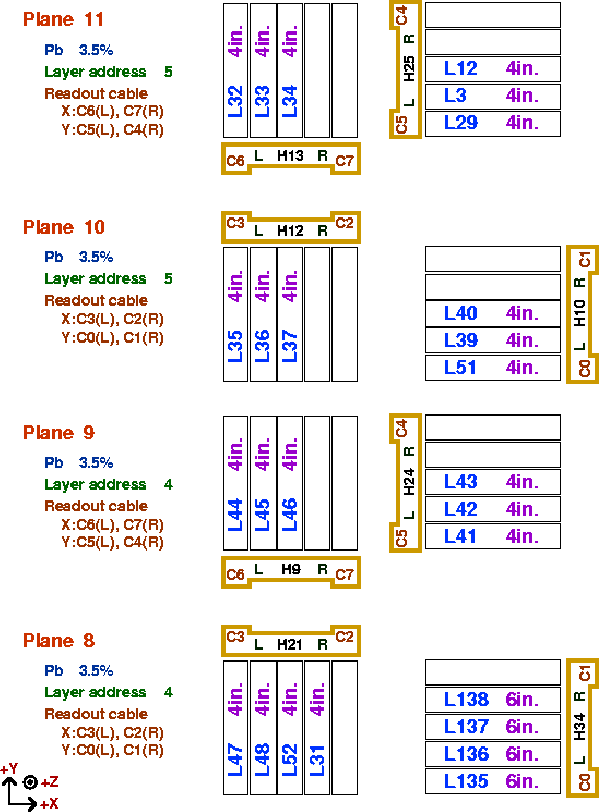
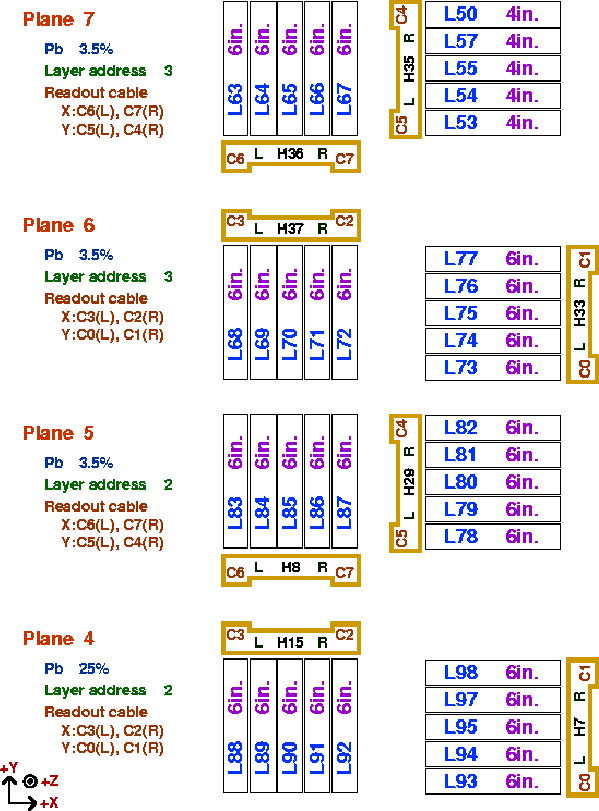
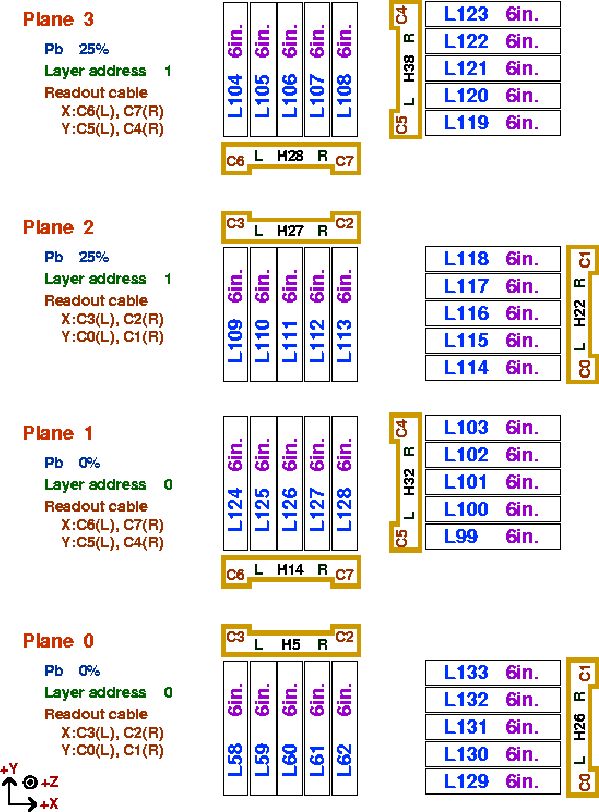
Table 2 summarizes the detector configuration of the tracker. Figure 2 shows the tray stack and the tracker coordinate system. Also, figures 3-6 shows detector coverage of each x-y plane with ID numbers of tray components indicated.

Table 2: Summary of 16 x-y planes of the tracker

Figure 2: Schematic drawing of the tray stack.

Figure 3: Schematic drawing of x-y planes.
On each plane, detector coverage of X- and Y-layers are shown. Also, a
readout electronics (HDI) is drawn next to each layer to show which side
of the layer the readout electronics attached. In the figure, detector
ladder ID's, HDI ID's, and Kapton cable ID's are also shown.

Figure 4: Schematic drawing of x-y planes (cont.)

Figure 5: Schematic drawing of x-y planes (cont.)

Figure 6: Schematic drawing of x-y planes (cont.)